跳转到主要内容 跳转到页脚
Troubleshooting a camper fridge not cooling is a core skill for camping sites. Misdiagnosing simple problems as unit failures leads to unnecessary warranty claims, lost rental income, and negative reviews. Most issues are simple field fixes, not product defects.
This guide provides factory-direct diagnostics for common power failures. We cover testing the 10A fuse in the 12V plug, identifying high-resistance connections that cause hot plugs, and re-calibrating a drifted thermistor using a simple ice-water test.
Ventilation Panic: Why Does Packing Too Tight Kill Cooling?
Packing a camping fridge too tight blocks internal air circulation. This creates warm ‘dead zones,’ forcing the cooling unit to overwork while failing to cool the contents.
The Critical Role of Internal Air Circulation
A portable fridge doesn’t just get cold; it actively circulates cold air to pull heat away from your food and drinks. When you pack items too densely, you physically block these air pathways. This traps pockets of warm air that the cooling system can’t reach, creating inconsistent temperatures. The compressor is forced to run constantly, burning more energy and putting unnecessary strain on the components, yet it still fails to hit the target temperature.
How the Internal Basket Promotes Airflow
This is exactly why our compressor models (35L and larger) include a removable wire basket. It’s not just for convenience. The basket’s open-wire design automatically creates a gap between your items and the fridge’s interior walls. This small space is critical. It guarantees that cold air can move freely around all your contents, from top to bottom, eliminating dead zones and ensuring a consistent temperature throughout the entire unit.

The “Hot Plug” Issue: Is the Cigarette Lighter Melting?
A melting plug is almost always caused by a poor electrical connection, not a faulty fridge. High resistance from a loose, corroded, or overloaded socket creates intense heat that melts plastic.
Root Causes of an Overheating Power Plug
When a customer reports a melted DC plug, the issue is almost never the appliance itself. The heat is generated at the point of connection due to high electrical resistance. This is a physics problem, not a product defect. The main culprits are simple and preventable.
- A loose fit between the plug and the socket is the number one cause. If the plug wobbles, it creates an unstable connection. Electricity has to arc across the tiny gaps, which generates extreme heat and melts the surrounding plastic.
- Corrosion or dirt on the metal contacts of the plug or inside the socket acts as an insulator. This forces the current through a smaller, cleaner surface area, concentrating the energy flow and causing a thermal bottleneck.
- Overloading the circuit happens when the vehicle’s socket wiring is old, undersized, or not designed for the continuous high draw of a compressor fridge. The socket itself can overheat, transferring that heat to the plug.
Best Practices for Your DC Power Cord
To prevent connection issues and ensure reliable performance, educate your customers on proper handling of the 12V/24V DC power cord we supply with every KelyLands unit.
- Always ensure the plug is pushed firmly and securely into the vehicle’s socket. It should feel snug, not loose. A solid physical connection equals a solid electrical one.
- Periodically inspect the plug’s metal contacts. They should be clean and shiny. If they look dull, black, or corroded, clean them with a soft abrasive to restore good conductivity.
- Never use a cheap, coiled extension cord with the DC power cord. Adding extra connections and thin-gauge wire introduces more points of failure and resistance, increasing the risk of overheating.
Your Custom-Branded Car Coolers, Certified Globally.

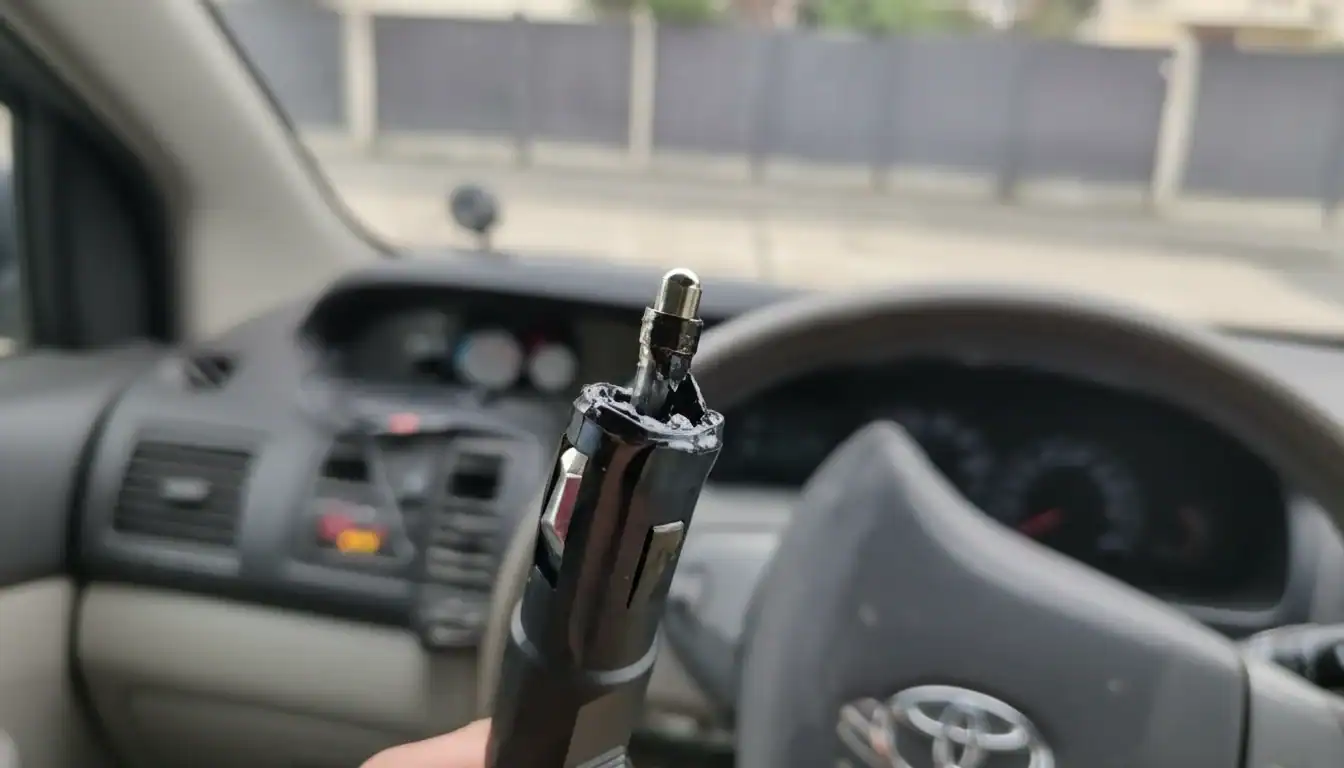
Fuse Blown? How to Check the Internal 10A Fuse?
If your car fridge suddenly stops working, the 10A fuse in the 12V plug is the most likely cause. Unscrew the plug’s tip to check it visually or with a multimeter.
| Step | Action & Verification |
|---|---|
| 1. Locate Fuse | Unscrew the silver tip of the 12V cigarette lighter plug. The glass fuse is located inside. |
| 2. Test Fuse | Use a multimeter on continuity mode. A beep means the fuse is good; silence means it’s blown. |
| 3. Replace Fuse | Install a new glass fuse with the exact same 10A rating. Do not use a higher amperage. |
| 4. Verify Power | If a new fuse blows instantly, inspect the vehicle’s 12V socket for debris or corrosion. |
Locating and Testing the Fuse
The primary 10A fuse isn’t inside the fridge itself. It’s located within the tip of the 12V/24V DC power cord—the part you plug into your car’s cigarette lighter socket. To access it, simply unscrew the silver end cap of the plug. The small glass tube fuse will come out, along with a small metal contact point.
A quick visual check often reveals a broken wire inside the glass, but a multimeter provides a definitive answer.
- Visual Check: Look closely at the thin wire inside the glass tube. If the wire is snapped or you see a dark scorch mark, the fuse is blown.
- Multimeter Test: Set your multimeter to the continuity setting (it usually has a sound icon). Touch one probe to each metal end of the fuse. A continuous beep means the circuit is complete and the fuse is good. No sound means the fuse is blown and must be replaced.
Fuse Replacement and System Protection
When replacing a blown fuse, you must use one with the exact same amperage rating—a 10A glass fuse. Using a higher-rated fuse (like a 15A) removes the safety protection and can cause permanent damage to the fridge’s internal electronics during a power surge.
If a correct, brand-new 10A fuse blows immediately, the problem is likely not the fridge. Check the vehicle’s power socket for any debris, corrosion, or loose wiring that could be causing a short circuit.
Our compressor fridges also include a built-in 3-Stage Battery Protection system. This electronic feature actively monitors the vehicle’s battery voltage. It helps prevent the deep voltage drops that can stress electrical components, adding another layer of defense against power-related failures.
Thermistor Drift: How to Re-calibrate Temps on the Fly?
A fridge’s temperature sensor can drift over time. You can fix this in the field by using ice water (0°C) as a reference and applying a corrective offset in the settings.
Understanding Why Temperature Readings Drift
The thermistor is the small electronic sensor inside the fridge that measures the internal temperature. Like any component, it can degrade slightly over many years of operation. This slow, predictable process is known as ‘drift’.
For a quality thermistor, this drift is minimal, often less than 0.02°C per year. But after five or more years, that can add up to a noticeable one-degree discrepancy. Re-adjusting for this accumulated drift helps maintain the precise temperature control your customers need for sensitive items like food and medicine.
Field Calibration Using an Offset Adjustment
You don’t need special tools to correct this. The fridge’s own control panel lets you apply a simple offset. First, you need a reliable temperature reference. The easiest one to create is 0°C (32°F).
Just fill a glass with a mix of crushed ice and distilled water. Place it inside the fridge and let it sit for an hour or so until the temperature stabilizes. The water is now at a known 0°C.
Now, check the fridge’s temperature display. If it shows 2°C, you know it has a +2°C drift. Go into the digital control panel’s advanced settings and apply a corrective offset of -2°C. This tells the controller to always subtract two degrees from the sensor’s reading, bringing the display and the actual temperature back in sync.
Frequently Asked Questions
Why isn’t my fridge cooling when plugged into an electric source?
If the unit cools properly on another power source like propane but not electric, the problem is likely with the AC electrical system. First, check that the power cord is secure and the circuit breaker hasn’t tripped. Next, listen for the evaporator fan; if it’s silent, it may be blocked or faulty. An incorrectly positioned thermistor (temperature sensor) can also prevent cooling. If these simple checks don’t resolve the issue, the control board or the heating element may need professional service.
What causes the 12V plug to get hot during use?
A hot plug is typically caused by high electrical resistance. This usually happens for one of three reasons: the power cable’s wiring is too thin for the fridge’s power draw, the connection points are loose or corroded, or there is an internal fault within the plug itself. A hot plug can melt connectors and is a fire risk, so you should stop using it and inspect your wiring and connections.
Where can I find the internal fuse?
The internal fuse location varies by model. It’s commonly found on the main control board, which is typically accessible by removing an exterior access panel on the back of the refrigerator. Some models may have it inside the main compartment. Always consult your user manual to find the exact location and to ensure you use the correct replacement fuse, as many units require a specific type like a 5-amp time-delay fuse, not a standard automotive one.
How much space does the cooler need for proper ventilation?
Both compressor and thermoelectric coolers need good airflow to get rid of heat. You should leave a minimum of 4 to 6 inches (10–15 cm) of clear space behind the unit, as this is where most heat vents are located. Blocking this area traps heat, which can reduce cooling efficiency, increase power consumption, and shorten the lifespan of the appliance.
Final Thoughts
Most fridge failures trace back to external factors like power connections, not the core unit. While generic options cut corners on these components, it leads to higher return rates that damage your brand. Our focus on robust power cords and built-in 3-Stage Battery Protection is your defense against these preventable support costs.
A reliable product line is your best tool for building dealer trust and minimizing service calls. We engineer our units for durability to lower your total cost of ownership. Contact our team to get the latest B2B catalog or to discuss your private label specifications.